 In the Darkroom
I use a lot of Ilford products, not surprising having worked for them for 21 years. I continue to use them because I consider them to be the best available on the market today. Here are a couple of brochures on Ilford and their products.
Ilford Product brochure 2018 Ilford-Product-Brochure-LOW-RES-WEB-1-2018
Ilford History brochure from 1879 IlfordHistoryBooklet125years
If you are looking for Ilford equipment manuals I have included quite a few of them below in case they are of use.
Enlargers
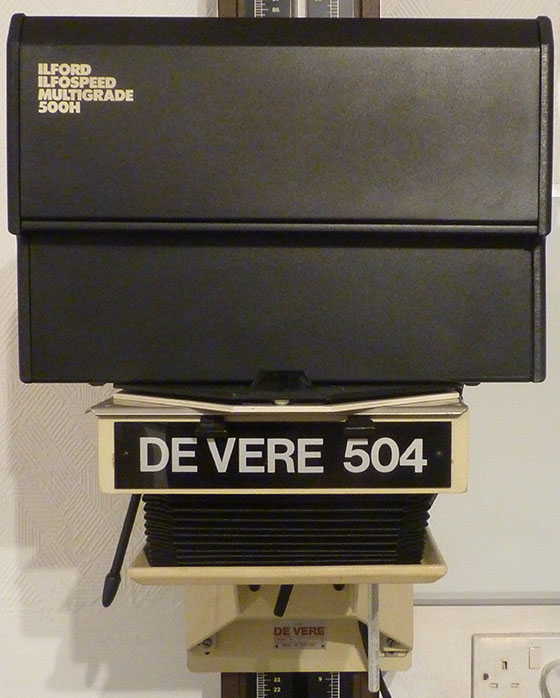
DeVere 504 with Ilford Multigrade 500H head

“I bought this in 2013 so that I had 2 enlargers capable of printing 5 x 4 inch negatives for clients on darkroom workshops. It has the advantage of bench-height focussing that is independent of enlarger head height. It also has a 500CPM keypad that allows the use of 9 memories for exposures, as well as a foot switch. This has become my main enlarger.”
Here are 2 versions of the official DeVere 504 manual
DeVere 504 manual including assembly, use, maintenance and spares. DeVere 504 Manual – Complete
DeVere 504 manual including more information on the different heads available. DeVere-504-Manual-0001-NEW
DeVere enlargers are still manufactured, refurbished and repaired by Odyssey Sales based in Brighton in the UK.
Here are the official Ilford manuals for the MG500, MG600 and MG400 systems
Ilford MG500 enlarger head user manual, with 500CPM control unit with 9 memories
Contents and Section 1 Introduction mg500-operating-manual-201172015792221-Section 1
Section 2 Description of System mg500-operating-manual-201172015792221-Section 2
Section 3 Controls mg500-operating-manual-201172015792221-Section 3
Section 4 Installation mg500-operating-manual-201172015792221-Section 4
Sections 5 to 9 Print Making with 500CPM Control Unit (keypad) mg500-operating-manual-201172015792221-Section 5 to 9
Sections 10 to 12 Exposure Probe, Roll Easel, Maintenance mg500-operating-manual-201172015792221-Section 10 to 12
Section 13 mg500-operating-manual-201172015792221-Section 13
Section 14 Specification, Quick Instructions Wall Charts mg500-operating-manual-201172015792221-Section 14 Quick Instructions
Ilford MG500 enlarger head user manual, with 500C control unit MG500userManual2007321151751747
Ilford MG500 enlarger head exposing probe user manual MG500exposingProbe2007321161244213
Ilford MG500 Service Manual mg500-exposure-system-service-manual-2007316164313762
Ilford EM10 Stand-Alone Exposure Probe technical information EM10exposureProbeUserManual2006821125512773
Ilford MG600 enlarger head user manual MG600-Operating-Manual
Ilford MG400 enlarger head user manual MG400-Operating-Manual
Durst 138S with Ilford Multigrade 500H head
“Bought in 2000 from ex-Ilford Photo Head Printer Mike Walden. This is the enlarger I used for all my black and white images for 13 years. The chassis is around 55 years old and still going strong. The Ilford Multigrade MG500 head is about 25 years old and is fantastic. It uses 2 x 300 watt quartz halogen lamps to give short exposure times which are constant over the entire contrast range (other systems need twice the exposure time for grades 4 to 5). I use split grade printing routinely and can program up to 9 different exposures in to the foot switch operated 500CPM key pad.”
DeVere 203 with Varicontrast head
“Acquired in 2016 from a regular client who could no longer work in his darkroom, so he gave me his enlarger in payment for a digital training course. This is an excellent enlarger for 35mm and up to 7 x 6cm negatives and for split grade printing and is mainly used by clients on black and white darkroom printing workshops. It has Ilford Multigrade filters built into the DeVere head, you just turn a small knob to dial in the required paper grade from 0 to 5. There is also a small light to illuminate the grade scale to make it easier to read under safelight. It also has the advantage of bench-height focussing that is independent of enlarger head height.”
DeVere 203 with Varicon head
“Given to me in 2015 by a retired professional photographer. This is a good enlarger for 35mm and up to 7 x 6cm negatives and is mainly used by clients on black and white darkroom printing workshops. It has condenser lenses above the negative so the extra glass surfaces need to be kept scrupulously clean. It has a filter drawer for Ilford Multigrade above the lens Filters. It also has the advantage of bench-height focussing that is independent of enlarger head height. I gave this away in 2023 to a client free of charge complete with lens and full set of condenser lenses.”
Durst M670 BW enlarger
This takes negatives up to 7 x 6 cm. It has a built-in filter drawer which holds Ilford Multigrade above the lens filters. It is also fitted with an Ilford Multigrade under the lens filter holder to make split grade printing much easier. I sold this in 2023.
“Bought new in 1986, my first medium format enlarger. I occasionally use this for printing my borders using lith negatives of various formats. A grade 5 Ilford MG filter in the enlarger filter drawer gives maximum contrast.”
Official Durst M670 BW + M670 Color Operating Manual durst-m670bw-m670color-operating-manual
Durst M670 Color enlarger
Bought second-hand in early 1990’s. This takes negatives up to 7 x 6 cm and is fitted with an Ilford Multigrade under the lens filter holder to make split grade printing much easier. I have been asked for details of replacement lamps for Durst M670 color enlargers since the original Durst Colamp 100S is no longer available. The 12 volt, 100 watt spare lamps that I use are Philips EFP A1/231. They are widely available and are generally sold as projector lamps. I sold this in 2023.
For Durst M670 Color operating manual see M670 BW section above for link to pdf
Enlarger lenses
Rodenstock Rodagon 150mm f5.6 x 2
Rodenstock Apo-Rodagon 90mm f4
Rodenstock Apo-Rodagon 80mm f4 x 2
Schneider Componon S 80mm f4
Rodenstock Rodagon 80mm f5.6
Schneider Componon WA 80mm f5.6
Schneider Componon S 50mm f2.8
Rodenstock Rodagon 50mm f5.6
“Mostly I use one of the Apochromatic Rodagon (Apo-) lenses for my work. These are free of most lens defects and are fantastic, especially for large prints.”
Rodenstock Enlarger Lenses Technical Datasheet rodenstock-lens-specs-2013-e_Rodenstock_Printing_CCD_43-62__8230
Nova Archival Print Washers 20x16in 20x24in
Able to wash between 5 and 11 prints, one of the 20 x 24 inch washers has a Washaid slot. Can be used for FB and RC papers.
If you use FB papers I suggest buying one with 11 slots as the wash time is quite long. If buying for RC papers the wash time is so short that you only need a small number of slots so the 5 slot version is plenty.
“They are essential for washing FB papers in a restricted space.”
Maco Ecomat TP5060 FB print dryer
The Rolls Royce of flatbed FB dryers for fibre-based prints. Takes paper up to 24 x 20 inches (slightly more than the 60 x 50 cm quoted by Maco).
“I dry paper with the image facing away from the heated platen and pull down the tensioned cloth directly onto this. Not used with glazing plate as I like the air-dried look. This dries FB prints in about 45 minutes. I use a low temperature setting of between 40 and 50 degrees Centigrade to try and minimise the curl that some FB papers often produce. It is fantastic for producing flat dry prints.”
Ilford 1250 RC Print Dryer Infra-red dryer from Ilford, 51 cm wide.
The photographic layer in gelatine, coated onto the resin coated (RC) paper surface, is slightly melted by the heat to produce the highest possible gloss. It has constant temperature but variable speed to control the finish.
Beware – if you run the dryer too slowly prints can dry and curl before exiting the dryer and become jammed inside!
“This takes paper up to 50 cm wide and dries a 16 x 12 inch RC print in about 15 seconds.”
Official Ilford 1250RC Dryer technical information and manuals:
Ilford 1250 Dryer Operating manual 1250OperatingManual2007316161556727
Ilford 1250 Dryer Operating poster 1250operatingPoster200731615543764
Ilford 1250 Dryer Service info 1250ServiceInfo2007319160192410
Ilford 1250 Dryer Service Manual 1250serviceManual2007319161452625
Ilford 1250 Dryer simple operating instructions 1250simpleOperatingInstructions20073201647131071
Ilford 1050 Dryer operating manual 1050-RC-001-Operating-Manual-0
Ilford 5250 Dryer operating manual 5250-user-manual
Pro-Co 220 Film Dryer
A tall cabinet that looks like a locker but with a heater and fan in the base. Film hangs from clips in the top and it is long enough to take 220 film.
“Although this takes 220 length films I just use it for 120 (Ilford discontinued 220 in 2003) and takes about 20 minutes to dry a film using very low heat.”
Safelights
Ilford DL10 wall mounted safelight with removable 10×8 inch Ilford 902 Multigrade safelight filter. Takes 240v 15w BC bayonet (UK) or E27 screw thread bulb/lamp (Europe)
Ilford SL1 wall mounted with built-in orange plastic filter. Takes 240v 15w E14 screw thread bulb/lamp (UK and Europe). In North America you’ll need an E12 bulb.
Also available from Ilford in the past although I have never had one: Ilford DL20 ceiling mounted safelight (hangs from 4 metal chains), also with 10×8 inch removable lower filter and a 12×10 inch removable upper filter. It takes similar bulbs/lamps to the DL10.
Ilford Safelight Technical Information Sheet 2010 Ilford-Safelight-2010-TI
Darkroom Materials
Ilford Multigrade Classic FB paper
Fibre based paper that can be processed to give archival prints that should last hundreds of years. Not easy to dry flat, often dries with wavy edges.
“This is the main paper I now use. The only way to definitely know what a dry FB print will look like is to make one and dry it! If you think you have the right densities in the wet print then you can guarantee the dry print will be too dense. When you see this, make another print but reduce the exposure time by 6% to 10%. Wash and dry the 2 prints, look at them carefully under good lighting, go back and do some more if you need to. This tones well with sepia and other toners.”
Selenium toner can be used for archival stability and the colour of the image will change to a purple/black.
Ilford replaced Multigrade IV FB with FB Classic in 2014. MGFB_classic_leaflet
Ilford MGFB Classic range leaflet 2014. MGFB-range-leaflet
Here are the official Ilford technical information sheets for the new and old products.
Ilford Multigrade FB Classic technical information Multigrade_FB_Classic_tech_sheet
Ilford Multigrade FB Cooltone technical information Multigrade_FB_Cooltone_tech_sheet
Ilford Multigrade FB Warmtone technical information Multigrade_FB_Warmtone_tech_sheet
Ilford Multigrade IV FB technical information MGIVFBti
Ilford Multigrade FB previous technical information WarmtoneFBti
Processing Ilford FB papers technical information ProcessingMGFBpapers200621111117720
Ilford Multigrade IV RC paper
A paper coated on base that has polythene on both sides to prevent chemicals diffusing into the fibres. This means wash times are 5 minutes instead of 60 minutes for FB. Dries flat and easy to handle.
“An excellent general purpose paper that I use for my small prints (up to 30 x 24 cm) and contact prints.”
Ilford technical information for Multigrade RC papers
Ilford Multigrade RC papers technical information Multigrade_IV_RC_tech_sheet
Ilford Multigrade RC Warmtone papers technical information WarmtoneRCti
Ilford Multigrade Art paper technical information Multigrade_Art_300_tech_sheet
Processing technical information for Multigrade RC papers ProcessingMGRCpapers200621111052496
Ilford making your first print brochure ilford-photo-making-your-first-print-200629187211322
Ilford Multigrade paper developer
This is my standard paper developer and gives short development times.
“I use this most of the time and it gives very slightly warm prints compared to PQU. It is not a warm tone developer! Expect subtle effects not gross ones. It is also a fast acting developer compared to some.”
Ilford paper developers technical information Ilford-Paper-Developer-TI
Ilford PQU paper developer
Another good print developer with performance similar to Multigrade developer apart from a small shift in image colour on the slightly cold (blue) side. The development times are usually double those for Multigrade developer.
“This has been around for years but it is very good. It was reformulated in the mid-90’s (with me as the Ilford project manager) to increase the shelf and dish life while retaining the performance that users had come to know and love. A classic.”
Ilford Ilfotec DDX film developer
Equivalent performance to ID11 but in a liquid concentrate. Probably the best film developer that Ilford make. It is also available as Ilfotec DD developer in 5 litre bottles – different name but same formula.
“This is the best film developer that Ilford make, by a long way, and I am not just saying that because I wrote some of the spec and helped develop it while I was at Ilford! Every film photographer should use it! It is a liquid concentrate diluted at least 1+4 for use. The performance is similar to Ilford ID11 powder developer but more reliable. I use 1+6 for 9 minutes with FP4+ 120 film. Work out your own development times, those provided by Ilford are too long for my way of working.”
Ilford film developers technical information Ilford-Liquid-Devs-TI
Ilford Film Processing Chart 2018 Film-processing-chart
Ilford Push Processing Films technical information Push-Processing-Films-2006-2102012331472
Ilford processing your first film brochure ilford-photo-processing-your-first-film-200629163442455
Ilford Ilfostop stop bath
Stop baths extend the life of fixer baths and prevent processing streaks. Ilfostop is made of citric acid (lemon juice) with a tiny amount of indicator. It is yellow when freshly made up and still in good condition. It is ineffective (as in useless) when the colour changes to colourless or purple.
“This is a low odour stop bath only available in 500 ml packs. It is citric acid with a small amount of indicator. Since I am asthmatic, having stop bath without acetic acid (an irritant to the respiratory system) is a big benefit to me.”
Ilford Hypam Fixer
Been around for donkey’s years. Diluted 1+4 for film and 1+9 for paper.
“A very reliable fixer that won’t let you down. Probably the most concentrated fixer on the market so lots of capacity for long printing sessions.”
Ilford Hypam Fixer and Rapid Fixer have had identical formulae since the early 1990’s.
Ilford Rapid Fixer technical information Ilford-Rapid-Fixer-TI
Ilford Washaid
Washaid reduces the wash time of FB papers considerably.
“I pour a 1 litre bottle into the washaid slot of my 24 x 20 in Nova washer and fill to the top with water. Wash prints for a few minutes to remove most of the fixer, then soak in Washaid for 10 minutes or so, finally wash for 30 to 60 minutes.”
Other Ilford processing technical information
Ilford Safelight technical information Safelight-2010-TI
Ilford system for reducing wash water use Reducing-Wash-Water
Processing chemical temperature compensation chart Temperature-compensation-chart
Ilford toning technical information Toning-TI
Ilford Developer Formulae 1953 Ilford-Formulae-Dev-1953
Ilford 2150RC table top processor
2150RC-Processor-Effluent-Data
2150RC-Processor-Operating-Information
2150RC-Processor-Operating-Manual
2150RC-Processor-Service-Information
2150RC-Processor-Simplified-Instructions
Ilford 2950RC print processing machine
MG2950-Service-Information-Revision-A
MG2950-Roll-Processing-Operating-Manual
MG2950-Processor-Service-Information
MG2950-Key-Operator-Instructions
MG2950-Chemicals-Pack-Information
Ilford 2650RC print processing machine MG2650-Processor-Service-Information
Ilford 2240RC print processing machine 2240RC-Sections-1-3
Ilford FP40 film processing machine
Ilford DT600 enlarger timer DT600Manual-v2
 Out shooting
Cameras and Lenses
Mamiya 7 and Mamiya 7 II cameras (6 x 7 cm format); 10 exposures on 120 film.
Mamiya 7 lenses: 43mm, 65mm, 80mm + 150mm.
“I mostly use the 43mm (roughly equivalent to a 21mm on a 35mm camera) or the 65mm. The 80mm and 150mm lenses are not used much. I have used Mamiya 7 cameras since 2006, for 13 years from 1993 I used Mamiya 6 cameras.”
Mamiya 7 II camera brochure (split in 2 parts)
Mamiya 6MF camera brochure
Filters
I use B+W filters where I can. They allegedly use the same glass as Heliopan but with brass mounts.
“I have stopped buying Heliopan filters as they changed the way they secure the glass into the mount, now using adhesive instead of a metal screw ring. The adhesive is unreliable and I have had glass fall out of the filter housing on more than one occasion and have others where the glass is loose and rattling in the mount. Also, the B+W mounts are brass which doesn’t freeze on to the lens in the cold.”
Heliopan and B+W filters:
- Light Red, Orange, Dark yellow, Yellow, Yellow/Green, Green
- UV, Skylight
- Heliopan RG715 (infra-red)
- B+W 92 (infra-red)
Light meter
Sekonic L-508 Zoom Master and L-758DR light meters.
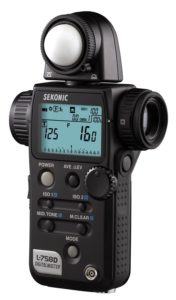
“I use my Sekonic meters in spot metering mode. This is much more accurate than the meter on the camera. I use it to check the exposure for each series of shots at any location and as the light changes.”
Sekonic L-758 and other light meters brochure sekonic-l758dr-light-meter-brochure-small
Sekonic L-758 light meter operating manual
L-758 Operating Manual Contents, Parts, LCD Display sekonic-l758-operating-manual-content-section-1-2
L-758 Operating Manual Setting Up, Basic Operation sekonic-l758-operating-manual-section-3-4
L-758 Operating Manual Measurement sekonic-l758-operating-manual-section-5
L-758 Operating Manual Measurement Using Wireless Trigger sekonic-l758-operating-manual-section-5-wireless-trigger
L-758 Operating Manual Advanced Functions sekonic-l758-operating-manual-section-6
L-758 Operating Manual Camera Exposure Profiling sekonic-l758-operating-manual-section-7
L-758 Operating Manual Accessories, Technical Data, Maintenance sekonic-l758-operating-manual-section-8-10
Sekonic L-508 light meter brochure sekonic-zoom-master-l508-light-meter
Sekonic L-508 Operating Manual sekonic l-508_english
Tripods
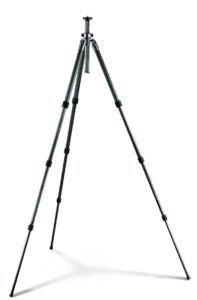
Ultra-lightweight for skiing, etc: Gitzo Mountaineer Mk2 G1028 4 section, 2 leg angles, carbon fibre; with Manfrotto 484RC2 quick release head. Together this combination of legs and head weighs just 1150 grams. It is very versatile and I carry this when out on really strenuous trips or skiing with my cameras.
Main tripod: Gitzo Mountaineer GT1541, 4 section, 3 leg angles, carbon fibre; with Manfrotto 486RC2 quick release head. This is a slightly larger heavier tripod but it is more sturdy, higher and more versatile so it has become my preferred tripod. Head and legs weigh 1554g so it is still pretty light. The head is reasonably solid too.
I also had a Gitzo GH1780QR quick release head but it was too fiddly to use in cold temperatures. The plate on the camera used to stick on pushing into the slot and the locking spring mechanism failed to release on several occasions preventing the camera plate sliding into place. Very fiddly to use. Not recommended. Sold on eBay!
Mountain camera case for 1 camera
LowePro Toploader 70AW + chest harness
“This is carried on the front on a shoulder harness. It can carry 1 Mamiya 7 camera and lens, Sekonic spot meter, plus film and filters. I can also strap a further lens in a case to the outside, such as the LowePro 9x13cm case. It’s not as deep as the Specialist so is better for skiing and climbing steep slopes as it doesn’t bang against my knees. It has a waterproof cover that covers the case except for the back panel. I carry a rucsack rain cover as well to completely cover the case in heavy rain “
Mountain camera case for 1 camera with 2 lenses
LowePro Inverse 100AW + chest harness
“This is also carried on the front on a shoulder harness and has a built-in padded waist belt. It can carry 1 Mamiya 7 camera and lens, Sekonic spot meter, plus a second lens, film and filters. It’s also not as deep as the Specialist so is good for skiing and climbing steep slopes as it doesn’t bang against my knees. It has a waterproof cover that covers the case except for the back panel. I carry a rucsack rain cover as well to completely cover the case in heavy rain “
Mountain and city camera case for 2 cameras with lenses
LowePro Street & Field Specialist 80AW + chest harness.
“This is a large case and is carried in exactly the same way – on the front for instant access, just above waist height. It is extremely convenient and has a weather resistant cover in case of rain or snow. It takes 2 Mamiya 7’s with lenses and has elastic pockets on either side which I use for a Sekonic light meter and GPS. LowePro discontinued this model in 2008. There are other cases of similar size that can be carried on the front on a chest harness but none that have a lid that opens away from you to stop things falling out of the case. The harness and waist belt hold it rock solid too although I don’t often use the waist belt. My bad back has meant that this case is seldom used in the hills and mountains as the total weight of 2 cameras is too great for anything other than small distances, but it is very convenient for city photography where I usually carry 2 cameras and 3 lenses.”
Travel and city case for up to 3 cameras
Peli 1510 rigid wheelie case
This is a rigid, practically indestructible, case with carry handles on 2 sides as well as wheels. It can also be used as a seat with a back rest; very useful in airport queues! The dimensions are within the hand luggage limit for most airlines and it fits into airline overhead luggage racks. External dimensions 55.9 x 35.1 x 22.9cm.
“I use this for city photography so that I do not have to carry camera gear around my neck or on my shoulders. Very useful if you have a bad back like me. Not that useful over cobbled streets (such as most of Amsterdam!) where it has to be carried, also not recommended for use on the hills, it gets stuck in the mud!
In use, it takes 2 Mamiya 7 cameras each with a lens, 2 other lenses, a light meter, 20 rolls of 120 film, 2 filter packs with 12 filters in total, batteries, cable releases, notepad and pens, small head torch, etc.
For travel, it is used as my carry on case and the weight is around 12kg with 3 Mamiya 7 bodies, 5 lenses, 2 spot meters and 4 filter packs with 24 filters. The other gear goes in the hold.”
Protection for lenses
LowePro 9x13cm lens case takes all my lenses (one at a time!)
Lens and camera wraps by Skooba Roadwired Advanced Protection System. These are squares of fleecy protective fabric with a mesh liner and velcro closures on all 4 corners. They come in different sizes: 12 inch for lenses, 15 inch for camera body, 20 inch for camera fitted with lens.
“I protect my lenses using Roadwired lens wraps. When properly used they protect from damage and are reasonably waterproof unless completely immersed in water. I also use one to protect the spare camera and lens in the rucksack.”
Mountain rucksack
Pod Black Ice 50 litre (1992 vintage and still going strong!)
“I use a 50 litre mountain rucksack with a waterproof liner for my hill gear. This also has enough space to take all my photo kit if the weather turns bad. The camera is carried in the LowePro Toploader case on my front using a shoulder harness. The camera can hang around my neck, ready for use, and sit on the top of the carry case ready for taking pictures. This avoids a stiff neck from having all the weight of the camera pulling down unsupported. My tripod is carried across the top of the case and is secured using a large karabiner clipped around the neck and a bendy gear tie to secure the legs.”
Day Sack
LoweAlpine Aeon 35
This is a small rucksack of 35 litres. It is just large enough to take the Toploader or Inverse cases with camera and 1 or 2 lenses along with waterproofs, water, and warm layers. The Specialist case is too large.
“This is the rucksack that I use most of the time, usually with just 1 camera and 1 or 2 lenses in the small Toploader case and spare lens in the LowePro 9x13cm case strapped to its side. It is very comfortable and has quite a few clever features as well as ice axe loops for the winter and wand pockets for maps, wind meter and Eccles Cakes.”
Camera Materials
Ilford FP4 Plus 120 film
A medium speed film with an ISO of 125. I use it at this rated value.
“This used to be the only film I used. It was very reliable and coped with a vast range of lighting conditions, unlike some of the more modern films. I used to use 220 film most of the time, to get 24 exposures per roll, but Ilford discontinued this format for all of their films in 2003. Now I have to carry twice the number of rolls of film and change them twice as often. Not pleasant in the cold winter weather of the high mountains. It is also twice the weight, 120 and 220 film weighed roughly the same, even though one gave twice the number of negatives.”
Ilford FP4 Plus technical information FP4-Plus-TI
Ilford Delta 400 120 film
A high speed film which I use at an ISO of 320 instead of the rated value of 400.
“I use this most of the time now as I’m often unable to carry a tripod because of back pain. It gives me almost 2 extra stops compared to FP4 such that I can hand-hold the camera.”
Ilford Delta 400 technical information 400-Delta-TI
Ilford SFX 120 film
Infra-red film that only gives the effect with the correct filter (Heliopan 715, Hoya R72, Ilford SFX gelatine filter). The full effect is only seen during periods of sunshine.
“This film is HP5 with different sensitising dyes so if you use without the special infra-red filter it behaves like down-rated HP5. Rated as 200 ISO on the box but the filter needs 4 stops and uncertainty in IR levels require a further 2 stops of bracketing to make sure of a shot. In reality this means you are working at between 3 and 12 ISO! It is impossible to see through the 715 filter either so unless using a rangefinder camera, like the Mamiya 7’s that I use, you need to compose the shot before screwing the filter on to the lens. You also need to stop the lens well down to allow for the shift in focus point with infra red light, to f16 at least.”
Ilford SFX technical information SFX-200-ti
Technical information for some other Ilford films
Ilford 100 Delta 100-Delta-TI
Ilford 3200 Delta 3200-delta-TI
Ilford Pan F Plus pan-f-plus-ti-20114271111491224
Ilford HP5 Plus HP5-Plus-TI
Ilford XP2 Super XP2S-TI
Ilford Ortho Plus Ortho-Plus-TI
Ilford Titan Pinhole Camera Exposure Calculator Pinhole-exposure-calculator
Ilford Obscura Pinhole Camera Exposure Calculator Ilford-Obscura-exposure-calculator
Ilford Notch Codes for Sheet Film Notch-Codes-Guide
Ilford Reciprocity Failure Compensation Calculation Factors Reciprocity-Failure-Compensation
Hill Gear
Apart from the usual equipment that has to be carried for a safe day on the hills, I usually carry:
Programmable GPS.
Satmap Active 20 with full Ordnance Survey 1:25k and 1:50k mapping for the UK. I also have the map cards for Germany, Norway, Switzerland, Austria, and French Alps. At present this is the best gps I have seen. It’s like looking at the local detailed walking map but with your position marked on it.
“This lets me pin-point photo locations by recording details at the time of shooting. It also provides a lot of navigation information to reduce the time needed for map reading. I have detailed maps for the UK, Switzerland, and elsewhere, it can be programmed with routes and important waypoints, such as at path junctions, to make navigation faster. When walking in unfamiliar mountains you do not have to look at the map every minute of the day either which lets me get on with the photography!”
Head Torch
Black Diamond Icon LED head torch. This is bright at 150 Lumens. Used to find the way at night.
I also have a Black Diamond Storm LED head torch for use in cities, it’s smaller and lighter than the Icon and both have a red light.
“LED head torches are very bright and last for many hours on 1 set of batteries. I usually keep one in the pocket of my waterproof jacket. The Icon is best for walking at night, especially in bad conditions or over rough ground as it is totally waterproof and has a bright beam. For a smaller torch to see around my photo kit at night I use a Black Diamond Storm. This lets me use a small amount of red light to find things in the dark in the camera case in cities but not so bright that I lose my night vision.”
Tools
Leatherman Juice CS4
“I always carry this in my camera case as a toolkit. It replaces the Victorinox Swiss Army knife that preceded it. The Leatherman has a good pair of pliers, a pair of scissors, several screwdrivers, a knife blade, bottle opener and a corkscrew for the odd celebration!”
In the Lightroom
Nikon Super Coolscan 9000ED film negative scanner which scans negatives up to 9 x 6cm at 4000ppi. Used with a special carrier with anti-newton glass top and plain glass bottom or film curl is a problem. Scans from 7 x 6cm negatives produce prints almost 1 metre in size at 300dpi with no upsizing. I always scan my negatives with this system for image licensing to make sure the negative is flat and I know the resolution will be excellent. Clients have printed up to 12 feet square from my 120 FP4 6x7cm negatives! Ilford Lab routinely print my image files from this scanner onto darkroom paper up to 1.2 metres square for me. That’s their maximum not the limit for the image file!
Epson Perfection V800 Photo flatbed scanner. I bought this as a quick way to scan negatives to put them on my website. I use the 4000ppi scan resolution to match the Nikon but it would go higher if I needed it to.
Nikon no longer support their scanners with software to run them so I use Vuescan, it’s reliable and effective. I use the Kodak TMax 100 preset with 0.5 to 0.7 contrast setting. I also use Vuescan for the Epson scanner as it already has my presets loaded.
For editing I use Adobe Photoshop on an iMac with a Wacom Intuos Pro tablet and Logitech Trackball mouse (to avoid RSI).


